

Basic Mehndi plans for kids
Here are a few basic and charming mehndi (henna) plans culminate for kids:
1. Fundamental Botanical Dabs
Little blossoms with specks around them.
Simple to draw and fast to dry.
2. Minor Butterflies & Hearts
Little butterfly or heart themes on the palm or fingers.
Negligible lines, culminate for small hands.
3. Peacock Quill (Scaled down Form)
A basic quill with a couple of twirls and dabs.Kids adore colourful peacock subjects!
4. Cartoon Characters (Mickey, Minnie, etc.)
Diagram of Mickey Mouse ears or a little sun. Fun and recognisable for children.
5. Basic Finger & Wrist Groups
Lean lines around fingers with modest dabs or takes off.
A fragile bracelet-like plan.
6. Charming Creature Faces (Cat, Bunny, Bear)
Little creature noses and bristles on the palm.
Perky and cute!
7. Sun & Moon Plan

A modest sun on the palm and a bow moon on the side.
Speedy and typical.
8. Scaled down Verdant Vine
A lean vine with little takeoff running along the fingers.
Light and exquisite.
Tips for Kids’ Mehndi:
✔ Utilize normal henna to dodge hypersensitivities.
✔ Keep plans little & basic (kids get anxious!).
✔ Dodge as well as much detail—bold traces work best.
✔ Let them choose a plan they like!
Would you like all of these outlined for superior understanding?
1. Essential Botanical Specks
Here’s a step-by-step breakdown of the Essential Flower Dabs mehndi plan for kids, in conjunction with a straightforward outline thought:
Plan:
Fundamental Flower Specks
Idealize for:
Back of the palm, fingers, or even modest feet!
Steps to Draw:
Begin with a central speck (utilize the henna cone’s tip to create a little circle).
Include petals:
Draw 4-5 modest bent lines (like a “U” shape) around the speck to make a blossom.
Keep petals small and symmetrical.
Encompass with specks:
Put 3-4 minor dabs around the blossom (like a radiance).
Include many scattered specks adjacent for a lively impact.
Rehash:
Make 2-3 scaled-down blooms in a push or cluster them haphazardly.
Varieties:
Finger emphasizes:
Include a single blossom + dabs on each fingertip.
Wrist border:
Tiny flowers + specks in a half circle close the wrist.
Why Kids Adore It:
✅ Super fast (dries quickly!).
✅ No complicated lines—just dots and bends.
✅ Looks charming indeed in case flawed!
Visual Direct:
(Envision the as your basic blossom with specks around it!)
Would you like me to propose indeed little plans for little children?
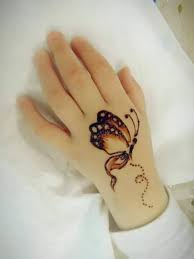
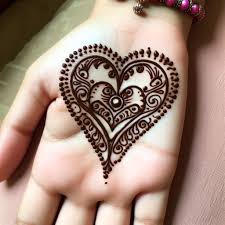
Minor Butterflies & Hearts
Here’s a super straightforward way to draw Little Butterflies & Hearts in mehndi for kids, with simple steps and visual signals:
1. Little Butterfly Plan Where:
Back of the palm, fingers, or wrist.
Steps:
Draw a little “X” shape (this shapes the butterfly’s wings).
Include bends:
Turn the “X” into a butterfly by drawing two delicate “C” shapes on each side (like brackets embracing the X:
.
Body:
A minor vertical line within the center (discretionary).
Specks for fun:
Include 2-3 dabs above/below the butterfly.
Visual:
(Super minimal—just wings and a line!)
2. Minor Heart Plan Where:
Fingertips, between thumb and record finger, or as a wrist highlight.
Steps:
Draw a “V” shape (the foot of the heart).
Near the beat:
Include two adjusted bumps over the “V” to create the heart.
Keep it minor:
No greater than a fingernail!
Visual:
(Or indeed fair a dab with a modest “V” underneath!)
Charming Combo Thoughts:
Butterfly + Heart:
Put a heart adjacent to a butterfly (like best companions!).
Finger emphasizes:
One heart per fingertip or a butterfly on the center finger.
Wrist chain:
Substitute hearts and butterflies in a push.
Master Tip:
If the cone is too thick for little plans, use a toothpick plunged in henna for additional exactness!
Would you like a micro-design for little children (like a single heart or fair wings)?
3. Peacock Plume (Scaled down Form)
Here’s a straightforward, kid-friendly peacock plume mehndi plan that’s simple to draw and dries rapidly:
Smaller than expected Peacock Quill Plan
Culminate for:
Back of the hand, wrist, or as a finger highlight.
Steps to Draw:
Bended Stem:
Draw a tender in reverse “C” shape (like a banana) for the feather’s spine.
Include the “Eye” of the Quill:
At the beat of the bend, a little tear or oval shape is made.
Straightforward Decorations:
Draw 3-4 brief, bent lines (like grins) joined to the spine for plumes.
Keep them brief and sparse—no requirement for thick points of interest!
Dabs for Enchantment:
Include 3-4 little specks along the spine or near the decorations for shimmer.
Visual Direct:
Envision the “•” as the eye, and the “)” lines as scaled-down decorations!)
Varieties for Kids:
Single Quill on Finger:
Fair the spine + 2 decorations (takes 10 seconds!).
Wrist Complement:
Match it with modest dabs or a smaller-than-expected heart.
Ultra-Simple Form:
Skip the frills—just a spine + eye + dabs!
Why Kids Adore It:
✅ Looks favor but easy to draw.
✅ Feels extraordinary (peacock = beautiful!).
✅ Fits indeed on little hands.
Master Tip:
In case the child cherishes colours, let them stick minor sequins on the dried henna for a “sparkle plume” impact!
Need an indeed smaller form (like a speck + one bend)?
4. Cartoon Characters (Mickey, Minnie, etc.)
Here’s a fun and secure way to draw kids-friendly Mickey, Minnie, and other cartoon characters in Mehndi—no aesthetic aptitudes required!
1. Mickey Mouse Outline
Where:
Palm center, wrist, or fingertip.
Steps:
Draw two little circles (side by side) for the ears.
Include a greater circle underneath (touching both ears) for the head.
Discretionary:
Modest bends for a grin or dabs for eyes.
Visual:
(Keep it strong and simple—no confront subtle elements required!)
2. Minnie Mouse Bow
Where:
Wrist, thumb base, or close to Mickey.
Steps:
Draw a little “X” shape.
Include two bent triangles on the sides (like butterfly wings).
Dab the center for charm!
Visual:
3. Straightforward Emoji-Style Faces
Pikachu:
Crisscross for ears + two dabs for cheeks.
Paw Watch:
Triangle ears + oval confront.
Hi Kitty:
Circle head + little oval eyes + no mouth!
Professional Tip:
Utilize a toothpick plunged in henna for better control of little plans.
Why Kids Adore These:
✅ Moment acknowledgment (“See, it’s Mickey!”).
✅ 5-second plans (no persistence required).
✅ Sets well with dots/hearts for a full “cartoon hand.”
Reward:
Let the child point where they need it—they’ll sit still in case they feel in charge!
Require an indeed lazier hack? Fair do Mickey ears + their names to begin with a letter in henna!
5. Basic Finger & Wrist Groups
Here’s a fast and simple direction to drawing straightforward finger and wrist groups in Mehndi for kids—minimal lines, most extreme charm!
1. Fundamental Finger Groups
Idealize for:
Small fingers (no smearing stresses!).
Plans:
Classic Ring:
Draw a single striking line around the finger (like a ring).
Include 3-4 little dabs or stars over it.
Crisscross Band:
A wavy line around the finger (like a squiggly bracelet).
Verdant Band:
Draw little “V” shapes (like clears out) associated with a line.
Visual:
—–•-•-•—– (Classic)
//// (Crisscross)
ᴧᴧᴧᴧᴧ (Verdant)
2. Wrist Sleeves
Where:
Fair over the wrist wrinkle (maintains a strategic distance from tickling!).
Plans:
Specked Line:
A dashed line (substituting specks and little lines).
Heart Chain:
Little ♡ ♡ ♡ associated by a lean line.
Sun & Moon Band:
Interchange and images with dabs.
Visual:
(Dabbed)
(Hearts) (Firmament)
Tips for Kids:
✔ Utilize thick lines—they dry quicker and see clearer.
✔ Dodge knuckles (skin folds smear plans).
✔ Let them select colors/glitter after drying!
Reward:
For little children, a fair one-specked band on the wrist = moment princess vibes!
Need a “no-draw” hack? Wrap a lean lace around the wrist and secure it with glue—it looks like Mehndi from a far distance!
6. Charming Creature Faces (Cat, Bunny, Bear)
Here’s a super straightforward way to draw lovable creature faces in mehndi for kids—minimal lines, most extreme fun!
1. Cat Confront
Where:
Palm center or thumb cushion.
Steps:
Draw a little “V” for the ears.
Include two dabs for eyes and a triangle nose.
Wrap up with 3 hair lines on each side.
Visual:
2. Bunny Confront
Where:
Back of hand or wrist.
Steps:
Draw two long “U” shapes for ears.
Include two specks for eyes and a little “X” mouth.
Visual:
3. Teddy Bear Confront
Where:
Fingertip or palm.
Steps:
Draw a little circle for the head.
Include circular ears (two half-circles on best).
Dab eyes + a sideways “T” for nose/mouth.
Visual:
Professional Tips:
Utilize a toothpick plunged in henna for little subtle elements.
Match with dots/hearts to fill the purge space.
For little children, fair do ears + nose—skip the rest!
Why Kids Cherish These:
✅ Moment acknowledgment (“It’s a kitty!”).
✅ Takes beneath 10 seconds per confront.
✅ Less smearing (modest plans dry quick).
Need a no-draw hack? Utilize non-toxic confront paint over dried henna to include colours!
7. Sun & Moon Plan
Here’s a fast and unconventional way to draw Sun & Moon mehndi plans for kids—perfect for minor hands and brief consideration ranges!
1. Little Sun Plan
Where:
Center of palm, wrist, or fingertips.
Steps:
Draw a little circle (or fair a dab!).
Include 4-6 brief, straight lines around it (like beams).
Discretionary:
Speck between beams for additional shimmer.
Visual:
(Takes 5 seconds—kids can indeed do it themselves!)
2. Bow Moon & Star
Where:
Side of palm, thumb base, or close to the sun.
Steps:
Draw a reversed “C” shape (bow moon).
Include a little star (an “*” or a speck with 4 lines).
Visual:
Charming Combos:
Day & Night Hand:
Sun on right palm + moon on cleared out.
Finger Trip:
Sun on thumb, moon on pinky.
Sky Wristband:
Substitute suns and moons around the wrist.
Why Kids Adore It:
✅ Typical and enchanted (sun = upbeat, moon = marvelous).
✅ Zero expertise required (fair circles and lines!).
✅ Sets well with stars/dots for a “universe” see.
Master Tip:
In case the child cherishes sparkle, spot a non-toxic stick + sparkle on the dried plan for an enormous impact!
Require a more diminutive form? Fair do a speck sun (• with one beam) and a comma-shaped moon!
8. Smaller than expected Verdant Vine
Smaller than expected Verdant Vine Mehndi Plan for Kids
Culminate for:
Little fingers, wrists, or a fragile border around the palm.
How to Draw:
Begin with a wavy or crisscross line (keep it lean and light).
Include little “V” or “U” shapes along the line (like a child clears out).
Discretionary:
Dab between clears out for additional charm!
Visual Direct:
(Envision the “ᴧ” as modest takes off on a squiggly vine!)*
**Super Straightforward Varieties:
**
1. **Pinky Finger Vine** – Fair 3-4 takes off on a brief line.
2. **Wrist Corona** – A vine circling the wrist (no got to interface!).
3. **Heart Clears out** – Swap “ᴧ” for little ♡ shapes.
**Why Kids Cherish It:
**
✅ **Looks favor but takes 10 seconds!
✅ **No smearing** (minor plans dry quick).
✅ **Sets well** with dabs or butterflies.
**Professional Tip:
** Utilize a **toothpick plunged in henna** for additional accuracy on little hands!
Need it indeed **littler**? Fair draw **one leaf + a dot**—it still looks purposeful!