
Here are a few basic, charming, and beginner-friendly mehndi plans for front hands that are simple to apply and are excellent:
1. Fundamental Mehndi Botanical & Specks
A little bloom within the center of the palm.
Straightforward takes off or vines amplifying toward fingers.
Beautify with little specks or dashes around it.
2. Finger Stripes with Smaller than expected Blooms
Draw straight or somewhat bent lines from the base of the fingers to the nails.
Include modest blossoms or hearts at the base of each finger.
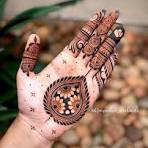
3. Peacock Plume (Disentangled)
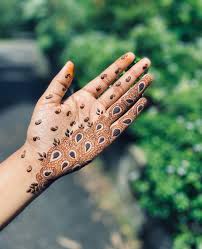
A little peacock quill plan on the palm.
Utilize a tear shape with basic lines interior.
Include little dabs or twirls around it.
4. Sun & Moon Plan
A little bow moon closes the thumb’s side.
A modest sun (circle with brief beams) on the other side.
Interface them with a lean, wavy line.
5. Heart & Vine
Draw a little heart within the center of the palm.
Amplify a lean vine with minor clears out toward the fingers.
6. Moderate Mandala (Minor Circle Plan)
A little circular theme within the center.
Include petals or modest designs around it.
7. Wrist Sleeve with Modest Points of interest
A lean bracelet-like plan around the wrist.
Include little blooms, crisscrosses, or dabs over it.
8. Butterfly & Dabs
A straightforward butterfly within the center of the hand.
Encompass it with little specks or stars.
Tips for Tenderfoots:
Utilize a lean cone for superior control.
Begin with little plans and hone on paper to begin with.
Let the mehndi dry totally (1-2 hours) for a darker recolour.
Would you like all of these plans with step-by-step enlightening?
Step-by-Step:
Fundamental Flower & Dabs (Front Hand Mehndi Plan)
This plan is ideal for beginners—it’s basic, rich, and fast to apply!
Materials Required:
Mehndi cone (with a fine tip for subtle elements)
Tissue or cotton swab (to settle botches)
Steps:
1. Begin with a Central Blossom
Draw a little circle within the center of your palm (this will be the flower’s center).
Around it, include 5-6 petals (like a daisy or sunflower). Keep them simple—U-shapes or tears work well.
2. Include Modest Clears out or Vines
From the sides of the blossom, draw two lean bent lines (like a “C” or “S” shape).
Include little takes off along these lines (fair draw a bent sprint with a pointed tip).
3. Brighten with Dabs & Dashes
Fill purge spaces with:
Minor dabs (like sprinkles around the blossom).
Brief dashes or commas close the vines for additional detail.
4. Amplify to Fingers (Discretionary)
Include little specks or a lean line at the base of each finger.
You’ll be able moreover to draw a scaled down blossom or heart on one finger for a charming touch.
Last Tips:
Let it dry for 1-2 hours for a darker recolour.
Dodge water for at least 6-8 hours after application.
If you make a botch, tenderly wipe with a cotton swab plunged in lemon juice.
Would you like a visual outline of this plan? I can portray it in more detail!
(This plan takes less than 10 minutes and looks delightful!)
Step-by-Step:
Finger Stripes with Smaller than Expected Blossoms
(Basic, exquisite, and culminate for apprentices!)
Materials Required:
✔ Lean mehndi cone (for exact lines)
✔ Cotton swab & lemon juice (for adjustments)
Steps:
1. Draw Finger Stripes
Begin at the base of each finger (close the palm).
Draw lean, straight, or somewhat bent lines running down to the nail.
You’ll be able to do:
Single stripe (straightforward & clean)
Double/triple stripes (for a bolder see)
2. Include Smaller than expected Blossoms at the Base
At the beginning point of each stripe (palm side), draw:
A modest 5-petal blossom (circle with U-shaped petals).
Or a streamlined dab blossom (central speck + 5 little dabs around it).
3. Beautify with Clears out & Specks
Include little bent clears out close to the blossoms.
Fill holes with little specks or dashes for a fragile touch.
4. Discretionary Wrist Sleeve
Draw a lean bracelet line around the wrist.
Include scaled-down hearts, crisscrosses, or specks over it for additional charm.
Tips for a Flawless See:
Keep stripes lean & even—practice on paper to begin with!
On the off chance that lines smear, spot them with lemon juice + cotton swab.
Let dry for 1-2 hours for a dim, long-lasting recolour.
Variety Thoughts:
Ring Finger Center:
Make one finger fancier (e.g., add a bigger blossom).
Boho Vines:
Supplant stripes with wavy vines + clear out.
Would you like a visual direction or more design proposals?
*(This plan takes fair 5-10 mins & looks so lovely!)*
Step-by-Step:
Streamlined Peacock Quill Mehndi
(Simple, rich, and culminate for apprentices!)
Materials Required:
✔ Lean mehndi cone (for fine subtle elements)
✔ Cotton swab + lemon juice (for fixes)
Steps:
1. Draw the Feather’s Spine
Begin at the base of your palm (close your wrist).
Draw a marginally bent line moving upward (like a delicate “C”).
2. Include the Plume Tip
At the beat of the spine, draw a little tear shape (this is often the feather’s “eye”).
3. Make the Plume Layers
Draw 3-4 bent lines (like enclosures) on each side of the spine.
Keep them brief and simple—no requirement for perplexing points of interest!
4. Beautify with Specks & Smaller than expected Fans
Include little dabs along the spine.
After each bent line, draw a little “fan” (3-4 dashes transmitting outward).
5. Discretionary Additional items
Palm Highlight:
Include a little bloom or whirl close to the feather’s base.
Fingers:
Amplify with lean stripes or specks for adjustment.
Tips for Victory:
✔ Utilize lightweight for lean, clean lines.
✔ If the plan feels as well plain, include additional specks or vines.
✔ Let dry for 1-2 hours for a profound recolor.
Variety Thoughts:
Twofold Plumes:
Draw two little plumes side-by-side.
Wrist Association:
Include a fragile bracelet underneath the quill.
Would you like a visual portrayal or more peacock-inspired themes?
(This plan takes under 10 mins and looks staggering!)
Step-by-Step:
Sun & Moon Mehndi Plan
(An unusual, beginner-friendly plan for your front hands!)
What You’ll Require:
✔ Fine-tip mehndi cone
✔ Cotton swab & lemon juice (for fixes)
1. Draw the Bow Moon
Begin close your thumb side (palm or lower wrist zone)
Draw a reversed “C” shape (like a grin)
Thicken the bend somewhat for permeability.
Master Tip:
Include little stars (specks with brief lines) around it for enchantment!
2. Make the Sun
On the inverse side (pinky side), draw a little circle.
Include brief, indeed beams around it (like a child’s sun drawing)
Keep beams basic – straight or somewhat wavy.
Variety:
Make a “winding sun” by drawing a circle with a whirling line interior.
3. Interface with a Wavy Line
Draw a delicate S-curve interfacing the moon and sun.
Include:
Little dabs along the line
Scaled-down takes off or hearts sprinkled along the way.
4. Discretionary Upgrades
Fingers:
Include sun/moon images on 1-2 fingertips
Wrist:
Expand with a fragile dabbed bracelet
Palm:
Fill negative space with modest stars
Why This Works for Tenderfoots:
✓ Employments fundamental shapes (circles, bends)
✓ Botches mix in (dabs cover blemishes!)
✓ Looks deliberateness indeed if topsy-turvy
Drying Tip:
Apply a sugar-lemon blend over dried mehndi for a darker recolour.
Would you like a coordinating left/right-hand variety?
*(Takes 5-8 minutes – culminate for celebrations or casual wear!)*
Step-by-Step:
Heart & Vine Mehndi Plan
(Sweet, straightforward, and idealize for apprentices!)
Materials Required:
✔ Fine-tip mehndi cone
✔ Cotton swab + lemon juice (for adjustments)
1. Draw the Heart
Begin within the center of your palm
Make a little, symmetrical heart:
Draw two adjusted bump assemblies at a point.
Keep it strong and basic (no shading required)
Tip:
In case freehand is precarious, make a light speck direct to begin with!
2. Include the Vine
From the heart’s base, draw a wavy line toward your fingers.
Substitute the vine course for a normal stream.
Keep the line lean and elegant.
3. Make Clears out Along the vine, include:
Basic takes off:
Fair bent dashes with pointed tips
Sprigs:
Modest “V” shapes branching off
Space them unevenly for natural see.
Reward:
Include 1-2 smaller-than-expected hearts along the vine!
4. Brighten with Specks & Highlights
Scramble little specks around the heart.
Include little twists at vine closes.
Discretionary:
Layout the heart with dashes
Plan Varieties:
Twofold Vine:
Department out to both sides of the heart
Finger Association:
Let the vine path onto one finger
Boho Fashion:
Supplant takes off with minor quills
Master Tips:
✓ Hone the vine movement on paper, to begin with
✓ On the off chance that takes off see muddled, turn them into berries (dabs)!
✓ Match with a straightforward wrist sleeve for adjusting
Drying Time:
1.5-2 hours for wealthy color
Would you like thoughts on coordinating left/right hands?
*(Takes fair 5-7 minutes – lovable for weddings or dates!)*
Step-by-Step:
Moderate Mandala Mehndi Plan
(A minor, rich central point for your palm—super simple for tenderfoots!)
Materials Required:
✔ Fine-tip mehndi cone
✔ Cotton swab + lemon juice (for touch-ups)
1. Begin with a Central Speck
Put a little dab within the center of your palm (this grapples the plan).
2. Make Concentric Circles
Draw 3-4 minor circles around the speck (like a bullseye).
Keep the dispersing even—no requirement for culminating symmetry!
Tip:
Pivot your hand as you draw for smoother circles.
3. Include Petals or Beams
Exterior the circles, draw:
Basic petals (U-shapes touching the external circle)
or
Brief dashed beams (like a sunburst)
4. Enhance with Micro-Patterns
Fill crevices with:
Little dabs between petals
Scaled-down crosses or stars
Small scale takes off (fair bent dashes)
5. Discretionary Expansions Fingers:
Include single dabs at the base of each finger
Wrist:
Interface to a lean bracelet line with little geometric designs
Why Tenderfoots Adore This:
✓ Botches mix in (blemishes see imaginative!)
✓ Takes beneath 5 minutes to total
✓ Works as a standalone piece or combined with other plans
Professional Tips:
Temperamental hands? Rest your drawing arm on a table.
As well plain? Include a moment modest mandala close the thumb.
Dull recolour trap:
Wrap with cling film after drying for 15 mins.
Variety Thoughts:
Flower Mandala:
Supplant beams with 5-6 petals
Boho Mandala:
Include uneven crisscross layers
Night Sky Topic:
Turn dabs into star groupings
Would you like a visual format for dispersing direction?
(Idealize for celebrations, bridal pre-events, or everyday wear!)